Table of Contents
ToggleFrom Illustrator to Word: Converting Illustrator Letterhead to a Word Template
Designing professional letterhead in Adobe Illustrator is a great way to ensure your brand’s identity is polished and visually appealing. However, many clients prefer to use Microsoft Word for their day-to-day documents. To Convert Illustrator letterhead to Word template involves a few steps. This guide will help you convert files from illustrator to word by first converting Illustrator letterhead into PNG and PDF formats, and then add them to a Word document. We’ll also cover how to print the converted letterhead without unwanted white borders in Word.
Why We Convert Letterhead From Illustrator to Word File
When clients ask to convert Illustrator letterhead to Word template, they typically have practical and functional reasons. Here are the main reasons why illustrator to word conversion is often requested:
1. Ease of Use:
- Microsoft Word is a widely used word processing software that many people are familiar with. Clients find it easy to use for their daily correspondence.
- Unlike Illustrator, which is primarily used by designers and may not be installed on all computers, Word is a common application that is readily available on most office and home computers.
2. Editability:
- Clients can easily edit text, adjust formatting, and make changes to the content of their documents in Word without needing advanced design skills.
- A Word template allows clients to create consistent documents with their letterhead while being able to update the text as needed for each new document.
3. Cost Efficiency
- Adobe Illustrator requires a paid subscription, which might not be justifiable for clients who only need to create basic documents. In contrast, Microsoft Word is often part of the standard office software package.
- Clients save money by not needing to hire a designer for every small change or new document.
Step-by-Step Guide for Converting Letterhead From Illustrator to Word Document
Method 1:
Create and Export Your Letterhead in Adobe Illustrator by Using PNG
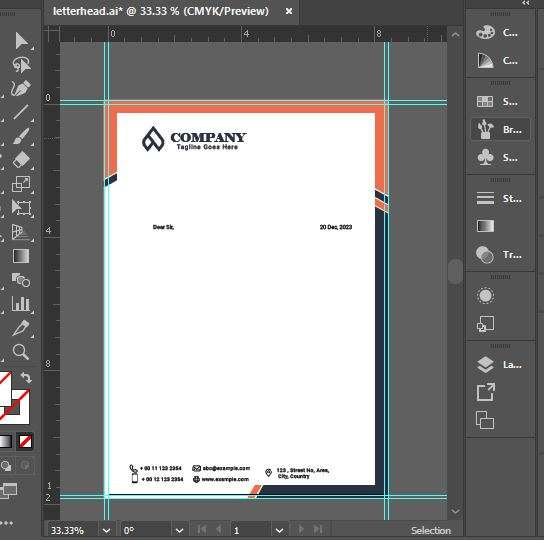
Design the letterhead in Adobe Illustrator with A4 size, 0.125″ bleed on each side, CMYK color mode for optimal printing, and 300 PPI for high-quality output. The document size, including the bleed, is 8.52″ x 11.94“.

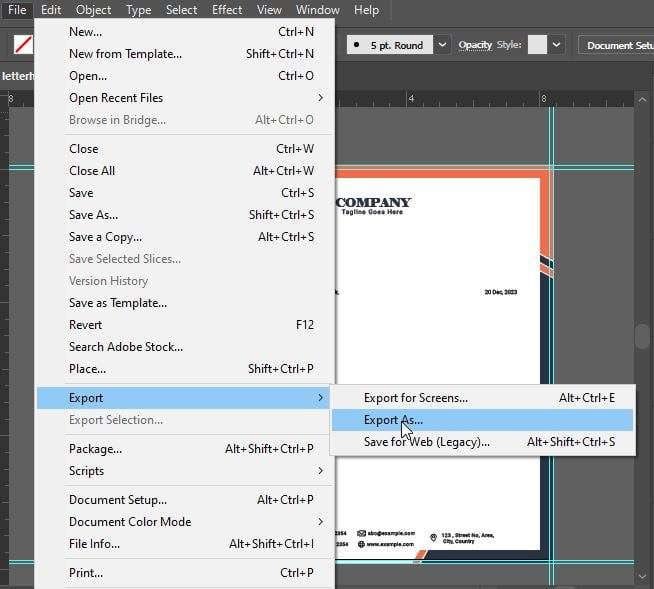
After designing letterhead in Illustrator, export it as PNG. Go to File > Export > Export As.

Choose PNG from the format drop-down. Select the Use Artboards checkbox if you want to export the artboard content only and Click Export.

Set the Resolution to 300 ppi (high resolution for print) and configure the PNG options (e.g., Background Color should be Transparent).

Inserting PNG into Word Document
Open Word: Open Microsoft Word and create a new blank document by clicking File > New Blank Document. To insert a PNG in the background, begin by setting up the page margins and custom page size in Microsoft Word. Adjust the page margins and set a custom page size by navigating to the “Layout” tab and selecting Margins > Custom Margins and Set all margins to zero.
Next, in the “Page Setup” dialog, click the “Paper” tab and choose “Custom Size” from the drop-down menu. Set the paper size to 8.52″ x 11.94” to adjust your full bleed design. This will allow your PNG image to extend to the edges of the page, giving your document a professional and polished appearance. By following these steps, you can easily create a full-bleed letterhead in Microsoft Word without being restricted by the default margins.

To insert a PNG in the header section, go to Insert > Header > Edit Header.
This will open the header section of the document. Within the header section, go to Insert > Picture > From File. Browse and select the PNG file of your letterhead and click Insert.

After inserting PNG, click on the image and Picture Format menu appears. Then go to Picture Format > Wrap Text. Choose Behind Text to position the PNG as needed. Then go to Position> More Layout options, Ensure that the Horizontal and Vertical Absolute positions are set to Page. This means that the positions should be fixed relative to the entire page, rather than relative to any specific element within the page. Set the Absolute Position to the right of page “Zero” and Absolute Position below the page “Zero“.
Close the header to start editing, Go to Header & Footer Tab > Close Header and Footer or simply double-click outside the header area. Your letterhead design should be displayed at its actual size of 100% and you have successfully exported letterhead from Illustrator to Word.

Now you can see the letterhead has covered the entire page. Once the PNG letterhead is inserted into the header section, it automatically appears on every page of the document. This eliminates the need to manually insert the letterhead on each page, saving time and effort.
Go to Layout > Margins and choose the margin settings that best suit your document. When you are not editing the header and footer, the letterhead design may appear faded on the screen. This is a default setting in Microsoft Word to distinguish the header and footer sections from the main body text. However, this faded appearance is only on-screen and will not affect the actual print quality. The letterhead will print in full clarity and detail, ensuring a professional and high-quality output.
Watch this video to learn how to convert an Illustrator letterhead to Word template by using PNG in the background. In this video, a step by step process is explained for converting illustrator file to word document.
Method 2:
Create and Export Your Letterhead in Adobe Illustrator by Using PDF
After designing letterhead in adobe illustrator Go to File > Save As, choose PDF from the dropdown menu, and click Save. In the PDF options, select the highest quality settings to ensure that your design maintains its resolution.

Inserting PDF into MS-Word
Open a new Word document where you want to use the letterhead. Set the custom page size by navigating to the “Layout” tab click Size> More Paper Sizes and “Page Setup” dialog will pop up. Click the “Paper” tab and choose “Custom Size” from the drop-down menu. Set the paper size to 8.52″ x 11.94” to adjust the full bleed design. After page setup, go to File> Open browse the location where PDF is saved and click ok.

After inserting PDF you can edit its design, colors and text. As you can see colors of the document has been changed. if you want to change the existing colors of the document to create a more visually appealing and customized look, you can easily do this by using PDF. Implement a text box feature that allows for easy editing within the document. Once all the desired modifications are in place, save the file as a word template for future use and reference.
For a visual guide on this process, you can watch our video that demonstrates each step in detail. This video will help you see exactly how to convert your Illustrator letterhead to Word template using the PDF method and ensure a seamless integration into your documents.
Saving the Word Template
After converting letterhead from Illustrator to word and adjusting your letterhead, whether you are using PNG in the background or PDF, save the document as a Word template.
- Go to File > Save As.
- Choose Word Template from the file type dropdown.
- Name your template and save it.

Now you have converted Illustrator letterhead to word template. Open the saved Word template when you need to create a new document with the letterhead and type your content as you normally would in Word.
Printing White Borderless MS-Word Letterhead
We often convert the Illustrator letterhead to Word template for easy customization and editing options. After editing ,Printing a letterhead from MS Word using a home printer can sometimes result in unwanted white borders around the document. This is often due to the printer’s margin settings. To achieve a borderless print, follow these steps:
Printer Limitations: Not all printers support borderless printing. Check your printer’s manual or manufacturer’s website to confirm if it has this feature.
Driver Updates: Ensure your printer drivers are up to date. Updated drivers can provide more options and better compatibility with your printer.
Custom Paper Size: If your printer doesn’t support standard borderless sizes, try setting a custom paper size that slightly exceeds your actual paper dimensions.
Resize Image: If the letterhead image is not covering the entire page, resize it within Word by dragging the corners of the image to fit the page dimensions.
Wrapping Up: Seamlessly Transitioning Your Illustrator Letterhead to Word
By following these steps, you can easily convert Illustrator letterhead to Word template, making it accessible for clients who prefer working with Microsoft Word. By exporting your Illustrator file to a suitable format, such as PNG or PDF, and then inserting it into Word, you can preserve the design and branding of your letterhead. Remember to adjust the layout and ensure all elements align correctly. With these steps, you’ll have a professional-looking letterhead ready for any document you need to create in Word. This process ensures that your professional design maintains its integrity and quality in a different format.


